Spring源码学习笔记之AOP

前言

Spring源码学习笔记,Spring-AOP实现大致过程,错误之处欢迎指正,共同学习

介绍

类应该是纯净的,不应含有与本身无关的逻辑。单一职责原则。

Spring AOP 接口设计

AOP概念总结

1.Advice
2.Pointcut
3.Advisor
4.Joinpoint
5.Aspect
--------------------------------------------------------------------
1.Advice(增强,定义在链接点做什么)
    a.Before Advice(执行前增强,实现MethodBeforeAdvice接口)
    b.Around Advice(环绕增强,可以实现以上三种功能,实现MethodInterceptor接口)
    c.After Running Advice(方法执行后增强,实现AfterRunningAdvice接口)
    d.After Throw Advice(抛出异常后增强,实现ThrowsAdvice接口)
    e.Introduction(引入,特殊的advice,普通advice都是作用在pointcut指定的方法上,而introduction作用在类上,可以添加类中没有的方法和属性)

2.Pointcut(连接点,定义匹配哪些方法)

3.Advisor(通知器,将 Advice 和 PointCut 结合起来,目的是为了将advice与pointcut解耦和)
    a.PointcutAdvisor(一个advice和一个pointcut,作用在某个连接点上)
    b.IntroductionAdvisor(作用于类上)

4.Joinpoint(连接点,所有可能的需要注入切面的地方。如方法前后、类初始化、属性初始化前后等等。pointcut只能选择连接点切入)
    a.通过joinPoint 参数,可以获取目标对象的信息,如类名称,方法参数,方法名称等

5.Aspect(切面,切面是切点和增强的集合,一般单独作为一个类。通知和切点共同定义了关于切面的全部内容,它是什么时候,在何时和何处完成功能。)

Spring AOP 的底层实现有两种可选,一种是 JDK 动态代理,一种是 CGLib 动态代理。先说下结论,如果要代理的 target 有接口,则默认采用 JDK 动态代理。如果没有,则采用 CGLib 动态代理。当然也可以强制指定使用 CGLib 动态代理。方法:

  • XML配置AOP: <aop:config proxy-target-class=”true”>
  • 注解配置AOP: <aop:aspectj-autoproxy proxy-target-class=”true”/>

CGLib 创建代理的速度比较慢,但创建代理后运行的速度却非常快,而 JDK 动态代理正好相反。如果在运行的时候不断地用 CGLib 去创建代理,系统的性能会大打折扣,所以建议一般在系统初始化的时候用 CGLib 去创建代理,并放入 Spring 的 ApplicationContext 中以备后用。

源码开始

Spring 使用 AOP 可以通过XML配置和注解两种方式,但是底层原理都是一样的。Spring 是否支持注解的 AOP 是由一个配置文件控制的,也就是<aop:aspectj-autoproxy />,当在配置文件中声明了这句配置的时候,Spring就会支持注解的 AOP,那么我们分析就从这句注解开始

1
2
3
4
5
6
7
8
9
10
11
12
13
14
15
16
17
18
19
20
21
22
23
24
25
26
27
28
29
30
31
32
33
34
35
36
// AopNamespaceHandler.java
public void init() {
// In 2.0 XSD as well as in 2.1 XSD.
registerBeanDefinitionParser("config", new ConfigBeanDefinitionParser());
registerBeanDefinitionParser("aspectj-autoproxy", new AspectJAutoProxyBeanDefinitionParser());
registerBeanDefinitionDecorator("scoped-proxy", new ScopedProxyBeanDefinitionDecorator());

// Only in 2.0 XSD: moved to context namespace as of 2.1
registerBeanDefinitionParser("spring-configured", new SpringConfiguredBeanDefinitionParser());
}

// 注册AnnotationAutoProxyCreator
public BeanDefinition parse(Element element, ParserContext parserContext) {
// 注册AspectJAnnotationAutoProxyCreator
AopNamespaceUtils.registerAspectJAnnotationAutoProxyCreatorIfNecessary(parserContext, element);
// 对于注解中子类的处理
extendBeanDefinition(element, parserContext);
return null;
}

public static void registerAspectJAnnotationAutoProxyCreatorIfNecessary(
ParserContext parserContext, Element sourceElement) {

BeanDefinition beanDefinition = AopConfigUtils.registerAspectJAnnotationAutoProxyCreatorIfNecessary(
parserContext.getRegistry(), parserContext.extractSource(sourceElement));
// 对于 proxy-target-class 属性的处理
useClassProxyingIfNecessary(parserContext.getRegistry(), sourceElement);
// 注册组件并通知,便于监听器做进一步处理
registerComponentIfNecessary(beanDefinition, parserContext);
}

public static BeanDefinition registerAspectJAnnotationAutoProxyCreatorIfNecessary(
BeanDefinitionRegistry registry, @Nullable Object source) {

return registerOrEscalateApcAsRequired(AnnotationAwareAspectJAutoProxyCreator.class, registry, source);
}

AnnotationAwareAspectJAutoProxyCreator

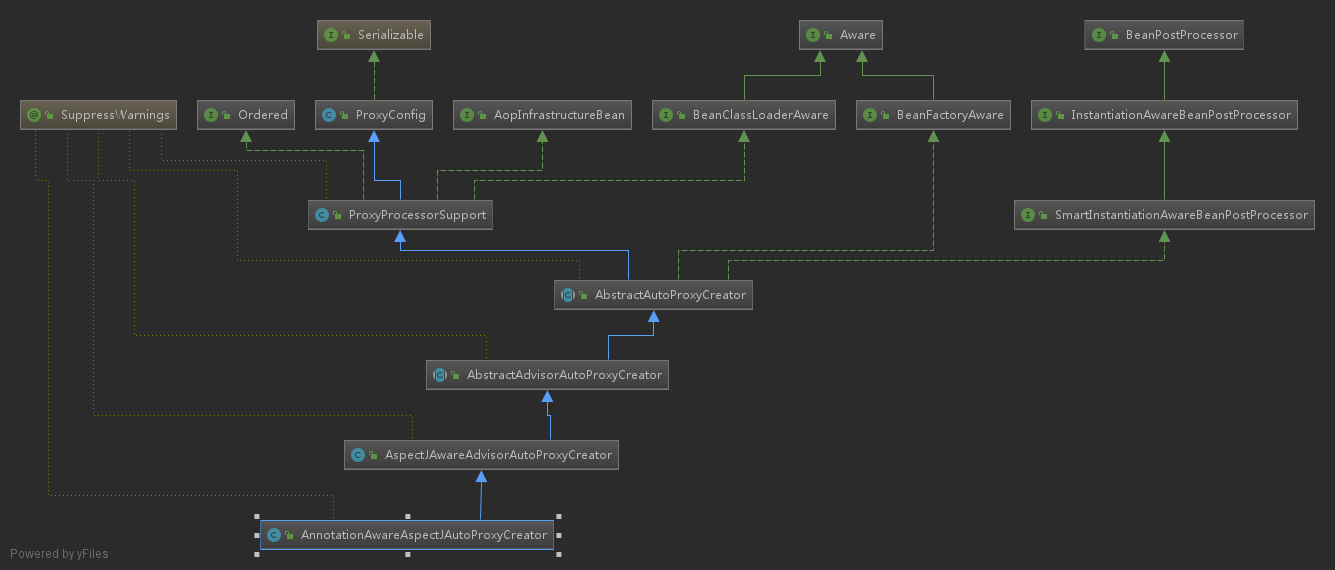
在类的层级中,我们看到 AnnotationAwareAspectJAutoProxyCreator 实现了 BeanPostProcessor 接口,而实现 BeanPostProcessor 后,当 Spring 加载这个 Bean 时会在实例化前调用其 postProcessAfterInitialization 方法,而我们对于 AOP 逻辑的分析也由此开始。

1
2
3
4
5
6
7
8
9
10
11
12
13
14
15
16
17
18
19
20
21
22
23
24
25
26
27
28
29
30
31
32
33
34
35
36
37
38
39
40
41
42
43
44
// 父类 AbstractAutoProxyCreator
public Object postProcessAfterInitialization(@Nullable Object bean, String beanName) {
if (bean != null) {
// 根据给定的 bean 的class和name构建出个key
Object cacheKey = getCacheKey(bean.getClass(), beanName);
if (!this.earlyProxyReferences.contains(cacheKey)) {
// 如果它适合被代理,则需要封装指定bean
return wrapIfNecessary(bean, beanName, cacheKey);
}
}
return bean;
}

protected Object wrapIfNecessary(Object bean, String beanName, Object cacheKey) {
// 如果已经处理过
if (StringUtils.hasLength(beanName) && this.targetSourcedBeans.contains(beanName)) {
return bean;
}
// 无需增强
if (Boolean.FALSE.equals(this.advisedBeans.get(cacheKey))) {
return bean;
}
// 给定的bean类是否代表一个基础设施类,基础设施类不应代理,或者配置了指定bean不需要自动代理
if (isInfrastructureClass(bean.getClass()) || shouldSkip(bean.getClass(), beanName)) {
this.advisedBeans.put(cacheKey, Boolean.FALSE);
return bean;
}

// Create proxy if we have advice.
// 如果存在增强方法则创建代理
Object[] specificInterceptors = getAdvicesAndAdvisorsForBean(bean.getClass(), beanName, null);
// 如果获取到了增强则需要针对增强创建代理
if (specificInterceptors != DO_NOT_PROXY) {
this.advisedBeans.put(cacheKey, Boolean.TRUE);
// 创建代理
Object proxy = createProxy(
bean.getClass(), beanName, specificInterceptors, new SingletonTargetSource(bean));
this.proxyTypes.put(cacheKey, proxy.getClass());
return proxy;
}

this.advisedBeans.put(cacheKey, Boolean.FALSE);
return bean;
}

函数中我们已经看到了代理创建的雏形。当然,真正开始之前还需要经过一些判断,比如是否已经处理过或者是否是需要跳过的bean,而真正创建代理的代码是从 getAdvicesAndAdvisorsForBean 开始的。
创建代理主要包含了两个步骤:

  1. 获取增强方法或者增强器
  2. 根据获取的增强进行代理

获取增强方法的实现

1
2
3
4
5
6
7
8
9
10
11
12
13
14
15
16
17
18
19
20
21
22
23
protected Object[] getAdvicesAndAdvisorsForBean(
Class<?> beanClass, String beanName, @Nullable TargetSource targetSource) {

List<Advisor> advisors = findEligibleAdvisors(beanClass, beanName);
if (advisors.isEmpty()) {
return DO_NOT_PROXY;
}
return advisors.toArray();
}

protected static final Object[] DO_NOT_PROXY = null;

protected List<Advisor> findEligibleAdvisors(Class<?> beanClass, String beanName) {
// 获取所有的增强
List<Advisor> candidateAdvisors = findCandidateAdvisors();
// 寻找所有的增强中适用于bean的增强并应用
List<Advisor> eligibleAdvisors = findAdvisorsThatCanApply(candidateAdvisors, beanClass, beanName);
extendAdvisors(eligibleAdvisors);
if (!eligibleAdvisors.isEmpty()) {
eligibleAdvisors = sortAdvisors(eligibleAdvisors);
}
return eligibleAdvisors;
}

获取增强器

1
2
3
4
5
6
7
8
9
10
11
12
13
14
15
16
17
18
19
20
21
22
23
24
25
26
27
28
29
30
31
32
33
34
35
36
37
38
39
40
41
42
43
44
45
46
47
48
49
50
51
52
53
54
55
56
57
58
59
60
61
62
63
64
65
66
67
68
69
70
71
72
73
74
75
76
77
78
79
80
81
82
protected List<Advisor> findCandidateAdvisors() {
// Add all the Spring advisors found according to superclass rules.
// 当使用注解方式配置 AOP 的时候并不是丢弃了对XML配置的支持
// 在这里调用父类方法加载配置文件中的 AOP 声明
List<Advisor> advisors = super.findCandidateAdvisors();
// Build Advisors for all AspectJ aspects in the bean factory.
if (this.aspectJAdvisorsBuilder != null) {
advisors.addAll(this.aspectJAdvisorsBuilder.buildAspectJAdvisors());
}
return advisors;
}

public List<Advisor> buildAspectJAdvisors() {
List<String> aspectNames = this.aspectBeanNames;

if (aspectNames == null) {
synchronized (this) {
aspectNames = this.aspectBeanNames;
if (aspectNames == null) {
List<Advisor> advisors = new ArrayList<>();
aspectNames = new ArrayList<>();
// 获取所有的 beanName
String[] beanNames = BeanFactoryUtils.beanNamesForTypeIncludingAncestors(
this.beanFactory, Object.class, true, false);
// 循环所有的 beanName 找出对应的增强方法
for (String beanName : beanNames) {
// 略过不合法的bean
if (!isEligibleBean(beanName)) {
continue;
}
// We must be careful not to instantiate beans eagerly as in this case they
// would be cached by the Spring container but would not have been weaved.
// 获取对应的bean的实例
Class<?> beanType = this.beanFactory.getType(beanName);
if (beanType == null) {
continue;
}
// 如果存在 Aspect 注解
if (this.advisorFactory.isAspect(beanType)) {
aspectNames.add(beanName);
AspectMetadata amd = new AspectMetadata(beanType, beanName);
if (amd.getAjType().getPerClause().getKind() == PerClauseKind.SINGLETON) {
MetadataAwareAspectInstanceFactory factory =
new BeanFactoryAspectInstanceFactory(this.beanFactory, beanName);
// 解析标记AspectJ注解中的增强方法
List<Advisor> classAdvisors = this.advisorFactory.getAdvisors(factory);
if (this.beanFactory.isSingleton(beanName)) {
this.advisorsCache.put(beanName, classAdvisors);
}
else {
this.aspectFactoryCache.put(beanName, factory);
}
advisors.addAll(classAdvisors);
}
else {
// ......
}
}
}
this.aspectBeanNames = aspectNames;
return advisors;
}
}
}

if (aspectNames.isEmpty()) {
return Collections.emptyList();
}
// 记录在缓存中
List<Advisor> advisors = new ArrayList<>();
for (String aspectName : aspectNames) {
List<Advisor> cachedAdvisors = this.advisorsCache.get(aspectName);
if (cachedAdvisors != null) {
advisors.addAll(cachedAdvisors);
}
else {
MetadataAwareAspectInstanceFactory factory = this.aspectFactoryCache.get(aspectName);
advisors.addAll(this.advisorFactory.getAdvisors(factory));
}
}
return advisors;
}

  1. 获取所有 beanName,这一步骤中所有在 beanFactory 中注册的Bean都会被提取出来
  2. 遍历所有 beanName,并找出声明 AspectJ 注解的类,进行进一步的处理
  3. 对标记为 AspectJ 注解的类进行增强器的提取
  4. 将提取结果加入缓存

寻找匹配的增强器

1
2
3
4
5
6
7
8
9
10
11
12
13
14
15
16
17
18
19
20
21
22
23
24
25
26
27
28
29
30
31
32
33
34
35
36
37
38
protected List<Advisor> findAdvisorsThatCanApply(
List<Advisor> candidateAdvisors, Class<?> beanClass, String beanName) {

ProxyCreationContext.setCurrentProxiedBeanName(beanName);
try {
// 过滤已经得到的Advisors
return AopUtils.findAdvisorsThatCanApply(candidateAdvisors, beanClass);
}
finally {
ProxyCreationContext.setCurrentProxiedBeanName(null);
}
}

public static List<Advisor> findAdvisorsThatCanApply(List<Advisor> candidateAdvisors, Class<?> clazz) {
if (candidateAdvisors.isEmpty()) {
return candidateAdvisors;
}
List<Advisor> eligibleAdvisors = new ArrayList<>();
// 首次处理引介增强
for (Advisor candidate : candidateAdvisors) {
if (candidate instanceof IntroductionAdvisor && canApply(candidate, clazz)) {
eligibleAdvisors.add(candidate);
}
}
boolean hasIntroductions = !eligibleAdvisors.isEmpty();
for (Advisor candidate : candidateAdvisors) {
// 引介增强已经处理
if (candidate instanceof IntroductionAdvisor) {
// already processed
continue;
}
// 对于普通bean的处理
if (canApply(candidate, clazz, hasIntroductions)) {
eligibleAdvisors.add(candidate);
}
}
return eligibleAdvisors;
}

findAdvisorsThatCanApply 函数的主要功能是寻找所有增强器中适用于当前 class 的增强器。引介增强与普通的增强处理是不一样的,所以分开处理。而对于真正的匹配在 canApply 中实现

1
2
3
4
5
6
7
8
9
10
11
12
13
14
15
16
17
18
19
20
21
22
23
24
25
26
27
28
29
30
31
32
33
34
35
36
public static boolean canApply(Pointcut pc, Class<?> targetClass, boolean hasIntroductions) {
Assert.notNull(pc, "Pointcut must not be null");
if (!pc.getClassFilter().matches(targetClass)) {
return false;
}

MethodMatcher methodMatcher = pc.getMethodMatcher();
if (methodMatcher == MethodMatcher.TRUE) {
// No need to iterate the methods if we're matching any method anyway...
return true;
}

IntroductionAwareMethodMatcher introductionAwareMethodMatcher = null;
if (methodMatcher instanceof IntroductionAwareMethodMatcher) {
introductionAwareMethodMatcher = (IntroductionAwareMethodMatcher) methodMatcher;
}

Set<Class<?>> classes = new LinkedHashSet<>();
if (!Proxy.isProxyClass(targetClass)) {
classes.add(ClassUtils.getUserClass(targetClass));
}
classes.addAll(ClassUtils.getAllInterfacesForClassAsSet(targetClass));

for (Class<?> clazz : classes) {
Method[] methods = ReflectionUtils.getAllDeclaredMethods(clazz);
for (Method method : methods) {
if (introductionAwareMethodMatcher != null ?
introductionAwareMethodMatcher.matches(method, targetClass, hasIntroductions) :
methodMatcher.matches(method, targetClass)) {
return true;
}
}
}

return false;
}

创建代理

在获取了所有对应bean的增强器后,便可以进行代理的创建了

1
2
3
4
5
6
7
8
9
10
11
12
13
14
15
16
17
18
19
20
21
22
23
24
25
26
27
28
29
30
31
32
33
34
35
36
37
38
39
40
protected Object createProxy(Class<?> beanClass, @Nullable String beanName,
@Nullable Object[] specificInterceptors, TargetSource targetSource) {

if (this.beanFactory instanceof ConfigurableListableBeanFactory) {
AutoProxyUtils.exposeTargetClass((ConfigurableListableBeanFactory) this.beanFactory, beanName, beanClass);
}

ProxyFactory proxyFactory = new ProxyFactory();
// 获取当前类中相关属性
proxyFactory.copyFrom(this);

// 决定对于给定的bean是否应该使用TargetClass而不是它的接口代理
if (!proxyFactory.isProxyTargetClass()) {
if (shouldProxyTargetClass(beanClass, beanName)) {
proxyFactory.setProxyTargetClass(true);
}
else {
// 添加代理接口
evaluateProxyInterfaces(beanClass, proxyFactory);
}
}

Advisor[] advisors = buildAdvisors(beanName, specificInterceptors);
// 加入增强器
proxyFactory.addAdvisors(advisors);
// 设置要代理的类
proxyFactory.setTargetSource(targetSource);
// 定制代理
customizeProxyFactory(proxyFactory);

// 用来控制代理工厂被配置之后,是否还允许修改通知
// 缺省值为false(代理被配置之后,不允许修改)
// private boolean freezeProxy = false;
proxyFactory.setFrozen(this.freezeProxy);
if (advisorsPreFiltered()) {
proxyFactory.setPreFiltered(true);
}

return proxyFactory.getProxy(getProxyClassLoader());
}

对于代理类的创建及处理,Spring委托给了ProxyFactory去处理,此函数中主要是对ProxyFactory的初始化操作,进而对真正的创建代理做准备。

  1. 获取当前类中的属性
  2. 添加代理接口
  3. 封装Advisor并加入到ProxyFactory中
  4. 设置要代理的类
  5. 为子类提供了定制的函数 customizeProxyFactory,子类可以在此函数中进行对 ProxyFactory的进一步封装
  6. 进行获取代理操作

将拦截器封装为增强器

1
2
3
4
5
6
7
8
9
10
11
12
13
14
15
16
17
18
19
20
21
22
23
24
25
26
27
28
29
30
31
32
33
34
35
36
37
38
39
40
41
42
43
44
45
46
47
48
49
protected Advisor[] buildAdvisors(@Nullable String beanName, @Nullable Object[] specificInterceptors) {
// 解析注册的所有InterceptorName
Advisor[] commonInterceptors = resolveInterceptorNames();

List<Object> allInterceptors = new ArrayList<>();
if (specificInterceptors != null) {
// 加入拦截器
allInterceptors.addAll(Arrays.asList(specificInterceptors));
if (commonInterceptors.length > 0) {
if (this.applyCommonInterceptorsFirst) {
allInterceptors.addAll(0, Arrays.asList(commonInterceptors));
}
else {
allInterceptors.addAll(Arrays.asList(commonInterceptors));
}
}
}
// ......

Advisor[] advisors = new Advisor[allInterceptors.size()];
for (int i = 0; i < allInterceptors.size(); i++) {
// 拦截器进行封装转化为Advisor
advisors[i] = this.advisorAdapterRegistry.wrap(allInterceptors.get(i));
}
return advisors;
}

public Advisor wrap(Object adviceObject) throws UnknownAdviceTypeException {
// 如果要封装的对象本身就是Advisor直接返回
if (adviceObject instanceof Advisor) {
return (Advisor) adviceObject;
}
// 封装方法只对 Advisor 和 Advice 两种类型的数据有效
if (!(adviceObject instanceof Advice)) {
throw new UnknownAdviceTypeException(adviceObject);
}
Advice advice = (Advice) adviceObject;
if (advice instanceof MethodInterceptor) {
// So well-known it doesn't even need an adapter.
return new DefaultPointcutAdvisor(advice);
}
for (AdvisorAdapter adapter : this.adapters) {
// Check that it is supported.
if (adapter.supportsAdvice(advice)) {
return new DefaultPointcutAdvisor(advice);
}
}
throw new UnknownAdviceTypeException(advice);
}

由于Spring中涉及过多的拦截器、增强器、增强方法等方式来对逻辑进行增强,所以非常有必要统一封装成Advisor来进行代理的创建

代理的创建与获取

1
2
3
public Object getProxy(@Nullable ClassLoader classLoader) {
return createAopProxy().getProxy(classLoader);
}

创建代理

1
2
3
4
5
6
7
8
9
10
11
12
13
14
15
16
17
18
19
20
21
22
23
24
25
26
27
28
29
protected final synchronized AopProxy createAopProxy() {
if (!this.active) {
activate();
}
// 创建代理
return getAopProxyFactory().createAopProxy(this);
}

public AopProxy createAopProxy(AdvisedSupport config) throws AopConfigException {
// 首先考虑使用cglib来实现代理对象,当然如果同时目标对象不是接口的实现类的话
if (config.isOptimize() || config.isProxyTargetClass() || hasNoUserSuppliedProxyInterfaces(config)) {
Class<?> targetClass = config.getTargetClass();
if (targetClass == null) {
throw new AopConfigException("TargetSource cannot determine target class: " +
"Either an interface or a target is required for proxy creation.");
}
if (targetClass.isInterface() || Proxy.isProxyClass(targetClass)) {
return new JdkDynamicAopProxy(config);
}
return new ObjenesisCglibAopProxy(config);
}
else {
// 这里使用JDK来生成Proxy,返回JDK类型的AopProxy
return new JdkDynamicAopProxy(config);
}
}
optimize控制cglib代理是否使用优化
ProxyTargetClass:true时,目标类本身被代理,而不是目标类的接口。即使用cglib代理
hasNoUserSuppliedProxyInterfaces: 是否存在代理接口

如果目标对象实现了接口,默认情况下会采用JDK的动态代理实现AOP
如果目标对象实现了接口,可以强制使用CGLIB实现AOP
如果目标对象没有实现了接口,必须采用CGLIB库,Spring会自动在JDK动态代理和CGLIB之间转换

区别:
JDK动态代理只能对实现了接口的类生成代理,而不能针对类
CGLIB是针对类实现代理,主要是对指定的类生成一个子类,覆盖其中的方法,因为是继承,所以该类或方法最好不要声明成final

获取代理
两种代理方式的使用方法

  1. JDK代理使用示例
    1
    2
    3
    4
    5
    6
    7
    8
    9
    10
    11
    12
    13
    14
    15
    16
    17
    18
    19
    20
    21
    22
    23
    24
    25
    26
    27
    28
    29
    30
    31
    32
    33
    34
    35
    36
    37
    38
    39
    40
    41
    42
    43
    44
    45
    46
    47
    48
    49
    50
    51
    52
    53
    54
    55
    56
    57
    58
    59
    60
    61
    62
    63
    64
    65
    66
    67
    68
    69
    70
    71
    // 业务接口
    public interface Subject {

    void request();

    void hello();
    }

    // 业务接口实现类
    public class RealSubject implements Subject{

    @Override
    public void request() {
    System.out.println("real subject execute request");
    }

    @Override
    public void hello() {
    System.out.println("hello");
    }
    }

    // 创建自定义的 InvocationHandler,用于对接口提供的方法进行增强
    public class JdkDynamicProxy implements InvocationHandler{

    //目标对象
    private Object target;

    public JdkDynamicProxy(Object target) {
    super();
    this.target = target;
    }

    //执行目标对象的方法
    @Override
    public Object invoke(Object proxy, Method method, Object[] args) throws Throwable {
    System.out.println("before");
    Object result = null;
    try{
    result = method.invoke(target,args);
    }catch (Exception e){
    System.err.println("ex:"+e.getMessage());
    throw e;
    }finally {
    System.out.println("after");
    }
    return result;
    }

    // 获取目标对象的代理对象
    public Object getProxy() {
    // System.getProperties().put("sun.misc.ProxyGenerator.saveGeneratedFiles", "true");
    return Proxy.newProxyInstance(Thread.currentThread().getContextClassLoader(),
    target.getClass().getInterfaces(),this);
    }

    }

    @Test
    public void test() {

    // 实例化目标对象
    Subject subject = new RealSubject();

    // 实例化 InvocationHandler
    JdkProxySubject jdkProxySubject = new JdkProxySubject(subject);

    // 根据目标对象生成代理对象
    Subject proxy = (Subject) jdkProxySubject.getProxy();
    proxy.request();
    }

执行结果如下

before
real subject execute request
after

那么,我们看看Spring中的JDK代理实现。继续之前的跟踪,到达JdkDynamicAopProxy.getProxy()

1
2
3
4
5
6
7
8
9
10
11
12
13
14
15
16
17
18
19
20
21
22
23
24
25
26
27
28
29
30
31
32
33
34
35
36
37
38
39
40
41
42
43
44
45
46
47
48
49
50
51
52
53
54
55
56
57
58
59
60
61
62
63
64
65
66
67
68
69
70
71
72
73
74
75
76
77
78
79
public Object getProxy(@Nullable ClassLoader classLoader) {
if (logger.isTraceEnabled()) {
logger.trace("Creating JDK dynamic proxy: " + this.advised.getTargetSource());
}
Class<?>[] proxiedInterfaces = AopProxyUtils.completeProxiedInterfaces(this.advised, true);
findDefinedEqualsAndHashCodeMethods(proxiedInterfaces);
return Proxy.newProxyInstance(classLoader, proxiedInterfaces, this);
}

public Object invoke(Object proxy, Method method, Object[] args) throws Throwable {
MethodInvocation invocation;
Object oldProxy = null;
boolean setProxyContext = false;

TargetSource targetSource = this.advised.targetSource;
Object target = null;

try {
if (!this.equalsDefined && AopUtils.isEqualsMethod(method)) {
// The target does not implement the equals(Object) method itself.
return equals(args[0]);
}
else if (!this.hashCodeDefined && AopUtils.isHashCodeMethod(method)) {
// The target does not implement the hashCode() method itself.
return hashCode();
}
else if (method.getDeclaringClass() == DecoratingProxy.class) {
// There is only getDecoratedClass() declared -> dispatch to proxy config.
return AopProxyUtils.ultimateTargetClass(this.advised);
}
else if (!this.advised.opaque && method.getDeclaringClass().isInterface() &&
method.getDeclaringClass().isAssignableFrom(Advised.class)) {
// Service invocations on ProxyConfig with the proxy config...
// 通过反射机制来对目标对象的方法进行调用
return AopUtils.invokeJoinpointUsingReflection(this.advised, method, args);
}

Object retVal;
// 有时候目标对象内部的自我调用将无法实施切面中的增强,则需要通过此属性暴露代理
if (this.advised.exposeProxy) {
// Make invocation available if necessary.
oldProxy = AopContext.setCurrentProxy(proxy);
setProxyContext = true;
}

// Get as late as possible to minimize the time we "own" the target,
// in case it comes from a pool.
// 这里是得到目标对象的地方,当然这个目标对象可能来自于一个实例池,或一个简单的Java对象
target = targetSource.getTarget();
Class<?> targetClass = (target != null ? target.getClass() : null);

// Get the interception chain for this method.
// 获取当前方法的拦截器链
List<Object> chain = this.advised.getInterceptorsAndDynamicInterceptionAdvice(method, targetClass);

// Check whether we have any advice. If we don't, we can fallback on direct
// reflective invocation of the target, and avoid creating a MethodInvocation.
// 如果没有设定拦截器,那么我们就直接调用目标的对应方法
if (chain.isEmpty()) {
// We can skip creating a MethodInvocation: just invoke the target directly
// Note that the final invoker must be an InvokerInterceptor so we know it does
// nothing but a reflective operation on the target, and no hot swapping or fancy proxying.
Object[] argsToUse = AopProxyUtils.adaptArgumentsIfNecessary(method, args);
retVal = AopUtils.invokeJoinpointUsingReflection(target, method, argsToUse);
}
else {
// We need to create a method invocation...
// 如果有拦截器的设定,那么需要调用拦截器之后才调用目标对象的相应方法
// 这里通过构造一个 ReflectiveMethodInvocation 来实现,封装拦截器
// 以便于使用其 proceed 进行链接表用拦截器
invocation = new ReflectiveMethodInvocation(proxy, target, method, args, targetClass, chain);
// Proceed to the joinpoint through the interceptor chain.
// 执行拦截器链
retVal = invocation.proceed();
}

// Massage return value if necessary.
// ......
}

invoke 函数最主要的工作就是创建了一个拦截器链,并使用 ReflectiveMethodInvocation 类进行了类的封装,而在 ReflectiveMethodInvocation 类的 proceed 方法中实现了拦截器的逐一调用

1
2
3
4
5
6
7
8
9
10
11
12
13
14
15
16
17
18
19
20
21
22
23
24
25
26
27
28
29
30
31
32
33
34
35
// 对拦截器的调用处理
public Object proceed() throws Throwable {
// We start with an index of -1 and increment early.
// 执行完所有增强后执行切点方法
if (this.currentInterceptorIndex == this.interceptorsAndDynamicMethodMatchers.size() - 1) {
return invokeJoinpoint();
}

// 获取下一个要拦截的拦截器
Object interceptorOrInterceptionAdvice =
this.interceptorsAndDynamicMethodMatchers.get(++this.currentInterceptorIndex);
if (interceptorOrInterceptionAdvice instanceof InterceptorAndDynamicMethodMatcher) {
// Evaluate dynamic method matcher here: static part will already have
// been evaluated and found to match.
// 这里获得相应的拦截器,如果拦截器可以匹配上的话,那就调用拦截器的invoke方法
InterceptorAndDynamicMethodMatcher dm =
(InterceptorAndDynamicMethodMatcher) interceptorOrInterceptionAdvice;
Class<?> targetClass = (this.targetClass != null ? this.targetClass : this.method.getDeclaringClass());
if (dm.methodMatcher.matches(this.method, targetClass, this.arguments)) {
return dm.interceptor.invoke(this);
}
else {
// Dynamic matching failed.
// Skip this interceptor and invoke the next in the chain.
// 如果拦截器匹配不上,那就调用下一个拦截器
return proceed();
}
}
else {
// It's an interceptor, so we just invoke it: The pointcut will have
// been evaluated statically before this object was constructed.
// 将 this 作为参数传递以保证当前实例中调用链的执行
return ((MethodInterceptor) interceptorOrInterceptionAdvice).invoke(this);
}
}
  1. CGLIB使用示例
1
2
3
4
5
6
7
8
9
10
11
12
13
14
15
16
17
18
19
20
21
22
23
24
25
26
public class MethodInterceptorDemo implements MethodInterceptor{

@Override
public Object intercept(Object obj, Method method, Object[] args, MethodProxy proxy) throws Throwable {
System.out.println("before in cglib");
Object result = null;
try{
result = proxy.invokeSuper(obj, args);
}catch (Exception e){
System.err.println("get ex:"+e.getMessage());
throw e;
}finally {
System.out.println("after in cglib");
}
return result;
}
}

@Test
public void test() {
Enhancer enhancer = new Enhancer();
enhancer.setSuperclass(RealSubject.class);
enhancer.setCallback(new MethodInterceptorDemo());
Subject subject = (Subject) enhancer.create();
subject.hello();
}

执行结果如下

before in cglib
hello
after in cglib

CglibAopProxy 有众多内部类。这些内部类是为了实现 Cglib 的各种回调而实现的。主要实现了 MethodInterceptor 接口,Callback 接口,Joinpoint 接口,Invocation 接口等待,总之是实现了Spring 的 cglib 模块的各种接口。

实现与 JDK 方式实现代理中的 invoke 方法大同小异,都是首先构造链,然后封装此链进行串联调用。
区别是JDK中直接构造 ReflectiveMethodInvocation,而在cglib中使用 CglibMethodInvocation。CglibMethodInvocation 继承自 ReflectiveMethodInvocation,但是proceed方法没有重写

总结

通过源码分析我们知道注解方式的底层是通过继承 ProxyProcessorSupport 来实现的,并且扩展的是 BenaPostProcessor 接口,通过Spring 的扩展接口,能够对特定的Bean进行增强。而 AOP 正是通过这种方式实现的。我们也可以通过扩展 Spring 的某些接口来增强我们需要的 Bean 的某些功能。

------本文结束感谢阅读------
显示评论
0%